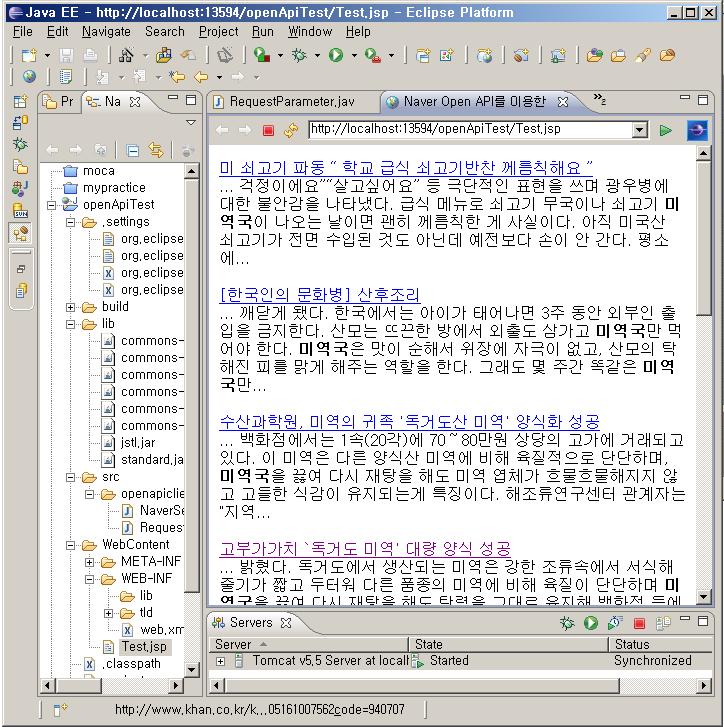
네이버 Open API Cafe에서 검색 API의 Java Client 모듈을 보게 되었습니다.
위의 모듈을 참고해서 같은 역할을 하는 모듈을 다르게 구현해봤습니다.
특징은 아래와 같습니다.
-
RSS를 파싱하는 부분을 XML parsing API로 널리 알려진 Digester(http://commons.apache.org/digester/)를 사용했습니다. Digester의 예제 코드로 제공되는 RSS파싱모듈을 그대로 써서 짧은 코드로 파싱이 가능했습니다.
-
API 문서 : (RSSDigester , Channel , Item)
-
-
요청 파라미터를 담는 클래스를 따로 뺐습니다. (RequestParameter.java) 이중 Target 값은 (blog, news 등 검색할 컨텐츠 유형을 선택하는 파라미터입니다.) enum으로 해서 정해진 값이 아닐 경우 compile이 안 되게 했습니다.
-
open API key값은 필수값이므로 OpenApiClient클래스의 생성자의 파라미터로 받았습니다. 대신 키 값이 없이 이 객체가 생성될 수 없도록 default 생성자는 private으로 돌려놨습니다.
첨부한 파일은 이클립스에서 Dynamic Web Project로 생성한 폴더를 압축한 것입니다. 테스트 실행 서버는 Tomcat 5.5를 사용했습니다. Eclipse WTP가 설치되어 있는 환경이면 실행이 가능합니다. 그리고 enum을 썼기에 Java5이상이어야 합니다.
Open API에 대한 자세한 사용법은 http://openapi.naver.com/index.nhn 를 참조하시면 됩니다.
소스코드
package openapiclient;

import java.io.InputStream;
import java.io.UnsupportedEncodingException;
import java.net.MalformedURLException;
import java.net.URL;
import java.net.URLEncoder;

import org.apache.commons.digester.rss.Channel;
import org.apache.commons.digester.rss.RSSDigester;

public class NaverSearchClient {

    private static final String OPEN_API_URL = "http://openapi.naver.com/search";
    private String key;

    @SuppressWarnings("unused")
    private NaverSearchClient(){};

    public NaverSearchClient(String key){
    this.key = key;
    }
    public Channel search(RequestParameter param) throws Exception{
        RSSDigester digester = new RSSDigester();
        URL requestUrl = getRequestUrl(param);
        InputStream is = requestUrl.openConnection().getInputStream();
     return (Channel) digester.parse(is);
    }

    private URL getRequestUrl(RequestParameter param) throws UnsupportedEncodingException, MalformedURLException {
        StringBuffer serverUrl = new StringBuffer(OPEN_API_URL);
        serverUrl.append("?target=" + param.getTarget());
        serverUrl.append("&key=" + key);
        serverUrl.append("&start=" + param.getStart());
        serverUrl.append("&display=" + param.getDisplay());
        serverUrl.append("&query=" + URLEncoder.encode(param.getQuery(), "UTF-8"));
        if(param.getSort()!=null) serverUrl.append("&sort=" + param.getSort());
        return new URL(serverUrl.toString());
    }
}package openapiclient;
public class RequestParameter {
public enum Category{
KIN,BLOG,CAFE,DOC,WEBKR,BOOK, SHOP, ENCYC,
KRDIC, JPDIC, ENDIC, NEWS, LOCAL, VIDEO,IMAGE;
public String toString(){
return super.toString().toLowerCase();
}
}
private Category target;
private String sort;
private int start;
private int display;
private String query;
// getter and setters 생략
}JSP에서 사용한 예제
JSTL을 함께 사용해서 찍어본 예제입니다. http://openapi.naver.com/index.nhn 에 가셔서 API key를 발급 받으시고 소스 중간에 밑줄로 표시된 부분에 그 값을 넣으시고 돌려주시면 됩니다.
<%@ page language="java" contentType="text/html; charset=EUC-KR"   pageEncoding="EUC-KR"%>
<%@ taglib prefix="c" uri="http://java.sun.com/jsp/jstl/core" %>
<%@ page import="openapiclient.RequestParameter" %>
<%@ page import="openapiclient.NaverSearchClient" %>
<%@ page import="org.apache.commons.digester.rss.Channel" %>
<%
 String KEY = "????"; // Open API key값을 넣으세요
 NaverSearchClient client = new NaverSearchClient(KEY);
 RequestParameter param = new RequestParameter();
 param.setDisplay(10);
 param.setStart(1);
 param.setQuery("미역국");
 param.setTarget(RequestParameter.Category.NEWS);
 Channel result = client.search(param);
 result.render(System.out); // 콘솔에 받아온 내용을 확인삼아 찍어봄
 request.setAttribute("result", result);
%>
<!DOCTYPE html PUBLIC "-//W3C//DTD HTML 4.01 Transitional//EN" "http://www.w3.org/TR/html4/loose.dtd">
<html>
<head>
<meta http-equiv="Content-Type" content="text/html; charset=EUC-KR">
<title>Naver Open API를 이용한 검색</title>
</head>
<body>
<c:forEach var='item' items='${result.items}'>
  <p>
  <a href="${item.link}"> ${item.title} </a> <br/>
  ${item.description}
  </p>
</c:forEach>
</body>
</html>
실행결과화면


Twitter
Google+
Facebook
Reddit
LinkedIn
StumbleUpon
Email